JUnit 5 作为新一代的 Java 单元测试框架,提供很多改进。例如对比 JUnit4 与 JUnit5 的官网,JUnit5 的设计更加简约与时尚,至少不会抗拒阅读的程度了(像破烂一样的网站,看了整个人都难受,不影响效率?不存在的)
而且,除此外,他的文档使用了 Asciidoc, 相对于markdown复杂,主要是它还支持具有包含另一个文件内容,这对于写API文档来说挺重要的,有兴趣可以了解下~
Okay, 结束吐槽,让我来看看 JUnit5 到底带来了哪些变化吧
JUnit 5 是什么? 与以往的版本不同,JUnit5 由三个模块模版组成 JUnit Platform + JUnit Jupiter + JUnit Vintage
JUnit Platform:运行测试框架的基础服务,定义了一套API,任何实现这套API的测试引擎,都能运行在这之上
JUnit Jupiter:一系列用于编写JUnit5测试或者扩展的组合,同时他的子项目提供了JUnit5测试引擎
JUnit Vintage:提供 JUnit3 和 JUnit4 的测试引擎
三分钟教程 环境搭建
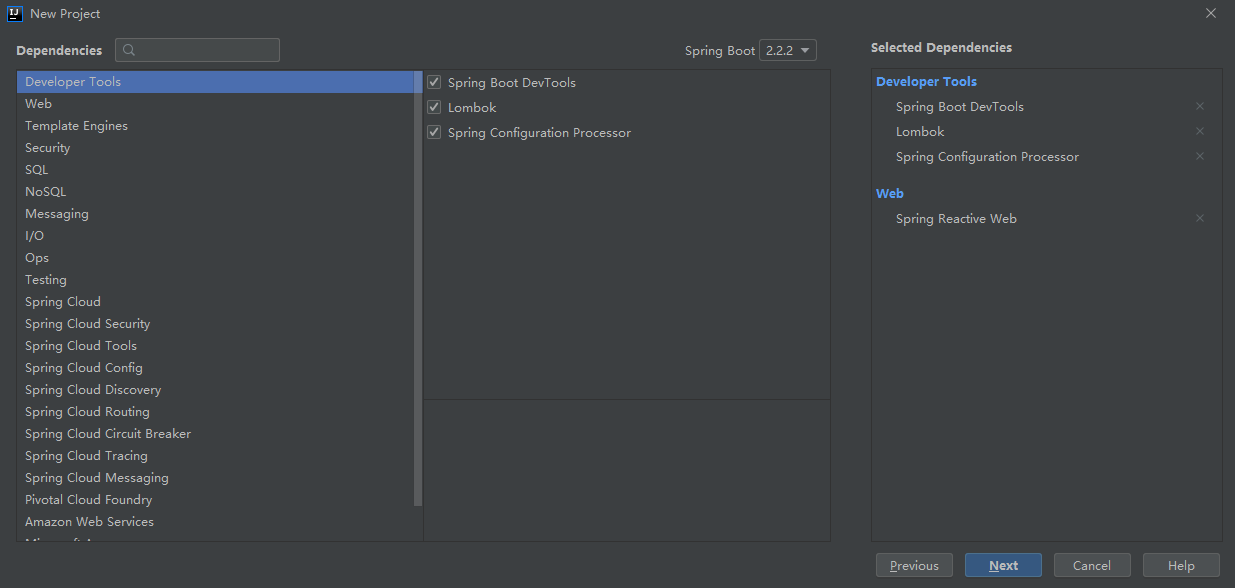
创建你的项目(建议Spring Boot),简单的勾选几个依赖
添加 JUnit5 的依赖(spring boot 2.2 中已默认是Junit5,不需要额外加,详见WIKI ),
1 2 3 4 5 6 <dependency > <groupId > org.junit.jupiter</groupId > <artifactId > junit-jupiter</artifactId > <version > ${latest-version}</version > <scope > test</scope > </dependency >
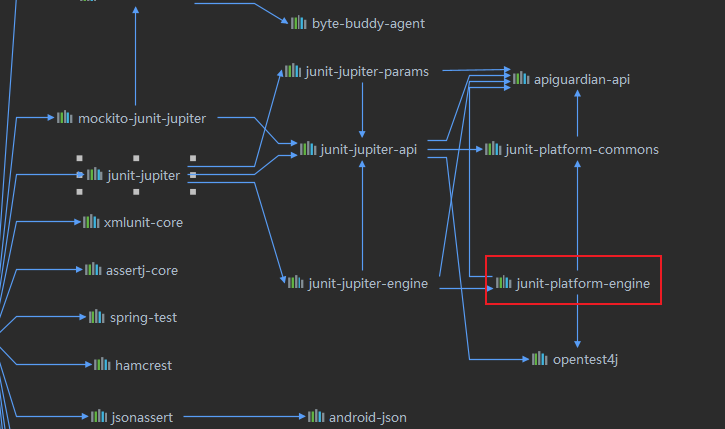
org.junit.jupiter:junit-jupiter已包含了 JUnit Platform,不需要额外声明依赖,一个就够了
第一个测试用例
创建一个待测试的工具类
1
2
3
4
5
public class TimeUtils {public static String hello (Instant now) {return "现在时间是:" + now.toString();
创建测试用例
1
2
3
4
5
6
7
8
class TimeUtilsTest {@Test void hello () {Instant now = Instant.now();String expect = "现在时间是:" + now.toString();
运行测试用例,如果你使用idea,那么直接点旁边的运行按钮,或者使用其它编辑器的功能测试,当然,你还可以选择通过命令行,下载junit-platform-console-standalone ,并运行它(不懂),另一种是mvn test运行测试
更多食用方案 别名 测试的Class可以通过添加@DisplayName(),添加别名
1
2
@DisplayName("时间工具类测试") class TimeUtilsTest {}
也可以使用@DisplayNameGeneration(),进行更多的配置
1
2
3
4
5
6
7
8
9
10
11
12
13
14
15
@DisplayNameGeneration(TimeUtils2Test.ReplaceUnderscores.class) class TimeUtils2Test {@Test void hello () {Instant now = Instant.now();String expect = "现在时间是:" + now.toString();static class ReplaceUnderscores extends DisplayNameGenerator .ReplaceUnderscores {@Override public String generateDisplayNameForClass (Class<?> testClass) {return "哈哈哈" ;
断言、假设 测试中核心之一,用于判断是否执行成功,在JUnit5中增加了些对lambdas的支持,例如:
1
2
3
4
@Test void asserts () {1 ,2 , () -> "1要是1" );
另外,还增加了假设
1
2
3
4
5
6
7
8
9
10
11
12
@Test void assume () {"DEV" .equals(System.getenv("ENV" )),1 , 1 );"DEV" .equals(System.getenv("ENV" )),"Aborting test: not on developer workstation" );
禁用 添加@Disabled()可以禁用测试,这个意义在于某一测试用例遇到问题,临时不执行,等待问题修复后再次使用的
1
2
@Disabled("Disabled 因为重复") class TimeUtilsCopyTest {}
测试执行条件 通过添加 @EnabledOnOs 或者 @DisabledOnOs 来决定在某一操作系统上执行.
1
2
3
4
5
6
7
8
9
10
@Test @EnabledOnOs(MAC) void testOnMac () {"exec on mac" );@Test @EnabledOnOs({ WINDOWS, LINUX }) void testOnOs () {"exec on windows or linux" );
@EnabledOnJre 和 @DisabledOnJre 可以对java环境判断
1
2
3
4
5
@Test @EnabledOnJre(JRE.JAVA_8) void testOnJava8 () {"exec on java 8" );
@EnabledIfSystemProperty/@DisabledIfSystemProperty 与 @EnabledIfEnvironmentVariable/@DisabledIfEnvironmentVariable 分别判断系统和环境变量,他们的匹配项支持正则表达式
1
2
3
4
5
@Test @DisabledIfEnvironmentVariable(named = "ENV", matches = ".*development.*") void notOnDeveloperWorkstation () {
标签/分组 JUnit5 中支持通过 @Tag() 对测试用例进行分组,例如
1
2
3
4
5
6
7
8
9
10
11
12
@Tag("conditional") @Test @EnabledOnOs(MAC) void testOnMac () {"exec on mac" );@Tag("conditional") @Test @EnabledOnJre(JRE.JAVA_8) void testOnJava8 () {"exec on java 8" );
@Tag() 有以下这些语法规则
不能为null或者空字符串
不能有空格
不能包含ISO控制符
不能包含保留字符(,,(,),&,|,!)
顺序 添加@TestMethodOrder(MethodOrderer.OrderAnnotation.class)与@Order(),定义测试用例的执行顺序
1
2
3
4
5
6
7
8
9
10
11
12
13
14
15
16
17
18
@TestMethodOrder(MethodOrderer.OrderAnnotation.class) public class OrderedTest {@Test @Order(2) void emptyValues () {@Test @Order(1) void nullValues () {@Test @Order(3) void validValues () {
生命周期 JUnit5 提供了4个生命周期注解 @BeforeAll @AfterAll @BeforeEach @AfterEach
@BeforeAll:在所有的 @Test @RepeatedTest @ParameterizedTest @TestFactory 之前执行
@BeforeEach:在每个测试用例前执行
@AfterAll @AfterEach:与before类似,在测试用例之后执行
例如:
1
2
3
4
5
6
7
8
9
10
11
12
13
14
15
16
17
18
19
20
21
22
23
24
25
26
27
28
@Slf4j @TestMethodOrder(MethodOrderer.OrderAnnotation.class) @TestInstance(TestInstance.Lifecycle.PER_CLASS) public class LifecycleTest {int num = 0 ;@BeforeAll static void initAll () {"initAll" );@BeforeEach void init () {"init" );@Test @Order(1) void doTest1 () {"num is " + num);1 ;"doTest1" );@Test @Order(2) void doTest2 () {"num is " + num);2 ;"doTest1" );
除此外,还有@TestInstance()配置,见上面的例子,这个存在两个模式
PER_METHOD:每个测试用例执行前,都会创建一个实例(默认,与junit4一致)
PER_CLASS:每个类的测试用例执行前,创建统一的实例
上面的例子中,得到的log为:
1
2
3
4
5
6
7
13:58:03.477 [main] ERROR com.jiangtj.example.junit5.LifecycleTest - initAll
doTest1() 的执行,影响到num属性的值,而默认模式下则不会
嵌套 @Nested() 可以更好的表达测试用例间的关系,例如官方的例子
1
2
3
4
5
6
7
8
9
10
11
12
13
14
15
16
17
18
19
20
21
22
23
24
25
26
27
28
29
30
31
32
33
34
35
36
37
38
39
40
41
42
43
44
45
46
47
48
49
50
51
52
53
54
55
56
57
58
59
60
61
62
63
64
65
66
67
68
69
70
71
@DisplayName("A stack") class TestingAStackDemo {@Test @DisplayName("is instantiated with new Stack()") void isInstantiatedWithNew () {new Stack <>();@Nested @DisplayName("when new") class WhenNew {@BeforeEach void createNewStack () {new Stack <>();@Test @DisplayName("is empty") void isEmpty () {@Test @DisplayName("throws EmptyStackException when popped") void throwsExceptionWhenPopped () {@Test @DisplayName("throws EmptyStackException when peeked") void throwsExceptionWhenPeeked () {@Nested @DisplayName("after pushing an element") class AfterPushing {String anElement = "an element" ;@BeforeEach void pushAnElement () {@Test @DisplayName("it is no longer empty") void isNotEmpty () {@Test @DisplayName("returns the element when popped and is empty") void returnElementWhenPopped () {@Test @DisplayName("returns the element when peeked but remains not empty") void returnElementWhenPeeked () {
我们可以清晰的看到他们之间的关系
重复测试 @RepeatedTest() 执行多次测试,支持name修改名称(具体见官网,觉得没多大意义),另外可以在方法中获取repetitionInfo参数,用于判断当前的执行情况(JUnit5支持注入参数,后续详说)
1
2
3
4
5
6
7
8
9
10
11
12
13
14
@Slf4j class RepeatedTestsDemo {@RepeatedTest(2) void repeatedTest () {"done!" );@RepeatedTest(2) void repeatedTest2 (RepetitionInfo repetitionInfo) {int currentRepetition = repetitionInfo.getCurrentRepetition();int totalRepetitions = repetitionInfo.getTotalRepetitions();"About to execute repetition %d of %d" ,
参数测试 @ParameterizedTest 很实用的注解,需要junit-jupiter-params依赖(我们已经添加了)
它主要是配置@xxxSource,注入参数,以完成测试,参数的注入方式有多种
数据源 @ValueSource 注入String内容,这是最常用的
1
2
3
4
5
@ParameterizedTest @ValueSource(strings = { "racecar", "radar", "able was I ere I saw elba" }) void palindromes (String candidate) {
@EnumSource 注入枚举类
1
2
3
4
5
6
7
8
9
10
11
@ParameterizedTest @EnumSource(TimeUnit.class) void testWithEnumSource (TimeUnit timeUnit) {@ParameterizedTest @EnumSource(value = TimeUnit.class, names = { "DAYS", "HOURS" }) void testWithEnumSourceInclude (TimeUnit timeUnit) {
@MethodSource 通过方法名注入(我更倾向于使用下面的@ArgumentsSource)
1
2
3
4
5
6
7
8
9
10
11
12
13
14
15
16
17
18
19
20
21
@ParameterizedTest @MethodSource("stringProvider") void testWithExplicitLocalMethodSource (String argument) {static Stream<String> stringProvider () {return Stream.of("apple" , "banana" );@ParameterizedTest @MethodSource("stringIntAndListProvider") void testWithMultiArgMethodSource (String str, int num, List<String> list) {"Content: %s is %d, %s" , str, num, String.join("," , list)));static Stream<Arguments> stringIntAndListProvider () {return Stream.of("apple" , 1 , Arrays.asList("a" , "b" )),"lemon" , 2 , Arrays.asList("x" , "y" ))
@CsvSource csv源支持
1
2
3
4
5
6
7
8
9
@ParameterizedTest @CsvSource({ "apple, 1", "banana, 2", "'lemon, lime', 0xF1" }) void testWithCsvSource (String fruit, int rank) {
它也支持从文件导入,例如@CsvFileSource(resources = "/two-column.csv", numLinesToSkip = 1)
@ArgumentsSource 通过自定义的参数提供器导入
1
2
3
4
5
6
7
8
9
10
11
@ParameterizedTest @ArgumentsSource(MyArgumentsProvider.class) void testWithArgumentsSource (String argument) {static class MyArgumentsProvider implements ArgumentsProvider {@Override public Stream<? extends Arguments > provideArguments(ExtensionContext context) {return Stream.of("apple" , "banana" ).map(Arguments::of);
参数转换 为了支持csv,JUnit支持了些内建的转换,详细见文档writing-tests-parameterized-tests-argument-conversion ,如果转换失败,会寻找构造器或者静态构造方法(非私有)中,单String的方法,来转换对应的对象
内建的转换有必要,但后一种,我宁愿得到报错,而不是转换,隐形的转换往往会导致莫名的问题出现
所以推荐通过@ConvertWith实现参数类型间的转换
1
2
3
4
5
6
7
8
9
10
11
12
13
@ParameterizedTest @ValueSource(strings = { "Wow,12", "radar,50"}) void toBook (@ConvertWith(ToBookConverter.class) Book book) {static class ToBookConverter extends SimpleArgumentConverter {@Override protected Object convert (Object source, Class<?> targetType) {String value = String.valueOf(source);"," );return Book.of(split[0 ], Integer.parseInt(split[1 ]));
JUnit中也内置了些转换,如@JavaTimeConversionPattern等
除外,还可以通过@AggregateWith转换或者接收ArgumentsAccessor对象
Dynamic测试 除了常规的@Test,我们还可以通过@TestFactory来构建整个测试树
1
2
3
4
5
6
7
8
9
10
11
12
13
14
15
16
17
18
19
20
21
22
23
24
25
26
27
28
29
30
31
32
33
34
35
36
37
38
39
40
41
42
43
44
45
46
47
48
49
50
51
52
53
54
55
56
57
58
59
60
61
62
63
64
65
66
67
68
69
70
71
72
73
74
75
76
77
78
79
80
81
82
83
84
85
86
87
88
89
90
91
92
93
94
95
96
97
98
99
100
101
102
103
104
105
106
107
108
109
110
111
112
113
class DynamicTestsDemo {private final Calculator calculator = new Calculator ();@TestFactory dynamicTestsWithInvalidReturnType () {return Arrays.asList("Hello" );@TestFactory dynamicTestsFromCollection () {return Arrays.asList("1st dynamic test" , () -> assertTrue(isPalindrome("madam" ))),"2nd dynamic test" , () -> assertEquals(4 , calculator.multiply(2 , 2 )))@TestFactory dynamicTestsFromIterable () {return Arrays.asList("3rd dynamic test" , () -> assertTrue(isPalindrome("madam" ))),"4th dynamic test" , () -> assertEquals(4 , calculator.multiply(2 , 2 )))@TestFactory dynamicTestsFromIterator () {return Arrays.asList("5th dynamic test" , () -> assertTrue(isPalindrome("madam" ))),"6th dynamic test" , () -> assertEquals(4 , calculator.multiply(2 , 2 )))@TestFactory return new DynamicTest [] {"7th dynamic test" , () -> assertTrue(isPalindrome("madam" ))),"8th dynamic test" , () -> assertEquals(4 , calculator.multiply(2 , 2 )))@TestFactory dynamicTestsFromStream () {return Stream.of("racecar" , "radar" , "mom" , "dad" )@TestFactory dynamicTestsFromIntStream () {return IntStream.iterate(0 , n -> n + 2 ).limit(10 )"test" + n, () -> assertTrue(n % 2 == 0 )));@TestFactory generateRandomNumberOfTests () {new Iterator <Integer>() {Random random = new Random ();int current;@Override public boolean hasNext () {100 );return current % 7 != 0 ;@Override public Integer next () {return current;"input:" + input;7 != 0 );return DynamicTest.stream(inputGenerator, displayNameGenerator, testExecutor);@TestFactory dynamicTestsWithContainers () {return Stream.of("A" , "B" , "C" )"Container " + input, Stream.of("not null" , () -> assertNotNull(input)),"properties" , Stream.of("length > 0" , () -> assertTrue(input.length() > 0 )),"not empty" , () -> assertFalse(input.isEmpty()))@TestFactory dynamicNodeSingleTest () {return dynamicTest("'pop' is a palindrome" , () -> assertTrue(isPalindrome("pop" )));@TestFactory dynamicNodeSingleContainer () {return dynamicContainer("palindromes" ,"racecar" , "radar" , "mom" , "dad" )
还未看过源码,但目测@Test是由内建的转换器,转换成DynamicNode,然后再执行。使用@TestFactory,tree型的代码也是种选择,再维护上,不差于@Test的常规方案
扩展 与 Junit4 不同,Junit5 提供了一个统一的一个扩展API。不过在之前,先看下另一个 Junit5 的重要特性–组合注解
组合注解 在官方文档中,这部分与注解部分一同讲的,但我将它移到此处,因为绝大多数情况下,他都是与扩展API一同使用。
组合注解,顾名思义,当一个注解上存在其他的Junit注解时,同时也继承这些注解的语义
例如:组合Tag与Test注解
1
2
3
4
5
6
@Target({ ElementType.TYPE, ElementType.METHOD }) @Retention(RetentionPolicy.RUNTIME) @Tag("fast") @Test public @interface Fast {
1
2
3
4
@Fast void asserts () {true );
Extend API 在 Junit5 中通过 @ExtendWith 注解实现添加扩展。
1
2
3
4
@ExtendWith(DatabaseExtension.class) public class SimpleTest {
1
2
3
4
5
6
7
8
9
10
11
@Slf4j public class DatabaseExtension implements BeforeAllCallback , AfterAllCallback {@Override public void beforeAll (ExtensionContext extensionContext) throws Exception {"连接数据库" );@Override public void afterAll (ExtensionContext extensionContext) throws Exception {"关闭数据库" );
@ExtendWith 提供了扩展的入口,具体的实现通过实现对应的接口,例如上面的 DatabaseExtension 实现 BeforeAllCallback,AfterAllCallback
在Junit中,存在许多扩展接口
ExecutionCondition 定义执行条件,满足条件时才能执行,下面是一个例子
1
2
3
4
5
6
7
@Target({ ElementType.TYPE, ElementType.METHOD }) @Retention(RetentionPolicy.RUNTIME) @ExtendWith(PassConditionalExtension.class) @Test public @interface Pass {value () ;
1
2
3
4
5
6
7
8
9
10
public class PassConditionalExtension implements ExecutionCondition {@Override public ConditionEvaluationResult evaluateExecutionCondition (ExtensionContext context) {return AnnotationUtils.findAnnotation(context.getElement(), Pass.class)"我很帅" ::equals)"pass" ))"pass is not okay!" ));
1
2
3
4
5
6
7
8
9
10
public class ConditionalTest {@Pass("密码不对不执行") void notExec () {@Pass("我很帅") void exec () {
TestInstanceFactory 定义测试实例,只能用于class上,暂时想不到例子,跳过~~
TestInstancePostProcessor 对测试实例处理,通常用于注入依赖,暂时想不到例子,跳过~~
TestInstancePreDestroyCallback 当测试实例销毁前调用,暂时想不到例子,跳过~~
ParameterResolver 处理参数,见下面例子
1
2
3
4
5
6
@Target(ElementType.PARAMETER) @Retention(RetentionPolicy.RUNTIME) public @interface BookInject {title () ;int price () default 0 ;
1
2
3
4
5
6
7
8
9
10
11
12
public class BookParameterResolver implements ParameterResolver {@Override public boolean supportsParameter (ParameterContext parameterContext, ExtensionContext extensionContext) throws ParameterResolutionException {return parameterContext.isAnnotated(BookInject.class);@Override public Object resolveParameter (ParameterContext parameterContext, ExtensionContext extensionContext) throws ParameterResolutionException {return parameterContext.findAnnotation(BookInject.class)null );
1
2
3
4
5
6
7
8
@Slf4j public class BookParameterTest {@Test @ExtendWith(BookParameterResolver.class) void exec (@BookInject(title = "删库") Book book) {
TestWatcher 监听测试用例的执行结果
1
2
3
4
5
6
7
8
9
10
11
12
13
14
15
16
17
18
19
@Slf4j public class LogTestWatcher implements TestWatcher {@Override public void testSuccessful (ExtensionContext context) {"wow, 成功了!" );@Override public void testAborted (ExtensionContext context, Throwable cause) {@Override public void testDisabled (ExtensionContext context, Optional<String> reason) {@Override public void testFailed (ExtensionContext context, Throwable cause) {
生命周期回调 在一开始的例子中就是生命周期的回调,这里不写例子拉,他们执行的先后顺序如下
BeforeAllCallback
BeforeEachCallback
BeforeTestExecutionCallback
AfterTestExecutionCallback
AfterEachCallback
AfterAllCallback
TestExecutionExceptionHandler 处理异常,如果存在一些自定义的运行时异常,这是很有用的,可以做些处理
1
2
3
4
5
6
7
8
9
public class IgnoreExceptionExtension implements TestExecutionExceptionHandler {@Override public void handleTestExecutionException (ExtensionContext context, Throwable throwable) throws Throwable {if (throwable instanceof Exception) {return ;throw throwable;
1
2
3
4
5
6
7
8
9
10
11
12
public class SimpleTest {@Test @ExtendWith(IgnoreExceptionExtension.class) void exec2 () throws Exception {throw new Exception ("被忽略" );@Test @ExtendWith(IgnoreExceptionExtension.class) void exec3 () throws Throwable {throw new Throwable ("不被忽略" );
Intercepting Invocations 拦截测试方法,类似于 Spring 中的 AOP
1
2
3
4
5
6
7
8
9
10
11
12
13
14
15
16
17
18
19
20
21
22
23
24
25
26
27
28
@Slf4j @ExtendWith(MyInvocationInterceptorTest.LogInvocationInterceptor.class) public class MyInvocationInterceptorTest {@ParameterizedTest @ValueSource(strings = { "racecar", "radar", "able was I ere I saw elba" }) void showParameterized (String candidate) {static class LogInvocationInterceptor implements InvocationInterceptor {@Override public void interceptTestTemplateMethod (Invocation<Void> invocation, ReflectiveInvocationContext<Method> invocationContext, ExtensionContext extensionContext) throws Throwable {Method executable = invocationContext.getExecutable();"executable method: " + executable.getName());"arguments: " + arguments.stream().map(String::valueOf).collect(Collectors.joining()));"targetClass: " + targetClass.getName());"invocation.proceed() start" );"invocation.proceed() end" );
InvocationInterceptor 中有多个方法 interceptBeforeAllMethod interceptTestMethod interceptTestTemplateMethod 等,分别在不同的时候拦截,里中 @ParameterizedTest 继承 @TestTemplate 所以使用 interceptTestTemplateMethod
拦截器中一般会传入这几个变量:
invocation: 测试请求,只有proceed()代表执行
invocationContext: 测试请求的上下文
extensionContext: 扩展的上下文
为 Test Templates 提供上下文 上面提到了 @ParameterizedTest 是由 @TestTemplate, 而 @TestTemplate 至少需要一个 TestTemplateInvocationContextProvider 提供时执行,在 @ParameterizedTest 中我们可以看到,@ParameterizedTest 由 ParameterizedTestExtension.class 提供测试的参数
1
2
3
4
5
@TestTemplate @ExtendWith(ParameterizedTestExtension.class) public @interface ParameterizedTest {
所以,相对于我写例子,直接学习它的源码可能更好,这是真实的案例,下面是 ParameterizedTestExtension.class 部分内容
1
2
3
4
5
6
7
8
9
10
11
12
13
14
15
16
17
18
19
20
21
22
23
24
25
26
27
28
29
30
31
32
33
34
35
36
37
38
39
40
41
42
43
44
45
46
47
48
49
50
51
52
53
54
55
56
57
58
59
60
61
62
63
class ParameterizedTestExtension implements TestTemplateInvocationContextProvider {private static final String METHOD_CONTEXT_KEY = "context" ;@Override public boolean supportsTestTemplate (ExtensionContext context) {if (!context.getTestMethod().isPresent()) {return false ;Method testMethod = context.getTestMethod().get();if (!isAnnotated(testMethod, ParameterizedTest.class)) {return false ;ParameterizedTestMethodContext methodContext = new ParameterizedTestMethodContext (testMethod);"@ParameterizedTest method [%s] declares formal parameters in an invalid order: " "argument aggregators must be declared after any indexed arguments " "and before any arguments resolved by another ParameterResolver." ,return true ;@Override public Stream<TestTemplateInvocationContext> provideTestTemplateInvocationContexts (ExtensionContext extensionContext) {Method templateMethod = extensionContext.getRequiredTestMethod();String displayName = extensionContext.getDisplayName();ParameterizedTestMethodContext methodContext = getStore(extensionContext)ParameterizedTestNameFormatter formatter = createNameFormatter(templateMethod, displayName);AtomicLong invocationCount = new AtomicLong (0 );return findRepeatableAnnotations(templateMethod, ArgumentsSource.class)this ::instantiateArgumentsProvider)0 ,"Configuration error: You must configure at least one set of arguments for this @ParameterizedTest" ));
在扩展中保持状态 熟悉前端的知道在 vue 或者 react 中都会涉及到状态 state 的保持,在junit 5 中也提供了类似的API Store (连名字都差不多。。。),大致上你可以理解为Map这类的东西,在 ParameterizedTestExtension 中也使用它存储了 METHOD_CONTEXT_KEY
在 Spring 中的使用
未完待续
最后 一个疑问,JUnit5 的注解风格和 Spring 为何如此接近。。。